Showing posts with label blogger. Show all posts

Friday, 17 December 2010

Tina's Tutorials #9: How to add external links to menubar

This tutorial will teach you how to add external links (links to non-pages) to your menu bar.

e.g. If you click on the link to "About Tina" on my menu bar above, you'll see that it leads to this site:
http://bookcouture.blogspot.com/p/about.html

Notice that there is a "p" there? This indicates that "About" is a Page on my blog.

But what if I want to link to a site that isn't a page? For example, the Book Contest Directory?


Click on the "International" link under my menu bar. Notice that the external website opens up in a new tab or window. This is what this tutorial will teach you to do for your blog.

Step 1:
Go to your blog Dashboard, and access the page Design, and the subtab Edit HTML.
Remember to backup your blog template by Downloading Full Template and saving it somewhere easily accessible.


Step 2:
Check the box Expand Widget Templates.

Using CTRL + F, search for <b:widget id='PageList1'.

You will then see code that looks something like this. Under <b:loop>, add the code in bold.

The parts you need to change are highlighted in red. Where it says URL, replace it with your link. Where it says Link Name, replace it with the name of the link you want visible on your menubar.

 - - - - - - - - - - - - - - - - - - - - - - - - - - - - - - - - - - - - - - - - -

<b:widget id='PageList1' locked='false' title='Pages' type='PageList'>
<b:includable id='main'>
  <b:if cond='data:title'><h2><data:title/></h2></b:if>
  <div class='widget-content'>
    <ul>
      <b:loop values='data:links' var='link'>
        <b:if cond='data:link.isCurrentPage'>
          <li class='selected'><a expr:href='data:link.href'><data:link.title/></a></li>
        <b:else/>
          <li><a expr:href='data:link.href'><data:link.title/></a></li>
        </b:if>
      </b:loop>
      <li><a href='URL' target='_blank'>Link Name</a></li>
    </ul>
    <b:include name='quickedit'/>
  </div>
</b:includable>
</b:widget>

 - - - - - - - - - - - - - - - - - - - - - - - - - - - - - - - - - - - - - - - - - 

Then click on Save Template and then View Blog to see your external link in your Menu Bar.

You're done! To add more, simply copy that line and repeat it, changing the URL and Link Name when needed.

✂ - - - - - - - - - - - - - - - - - - - - - - - - - - - - - - - - - - -

More Tips & Tricks from Tina:

Saturday, 2 October 2010

Tina's Tutorial #7: How to Change from Classic to New Blogger Template

This tutorial is to teach those of you with Classic Template blogs to upgrade to the new format:
 
Do I have a Classic Template? 

Classic Template

If so, in your Dashboard, it'll look like the image above. You'll have a “Template” link or tab instead of “Layout."

New Template

Why should I get a New Template?

You need to switch to the Layout Template to use the Template Designer (see the image below). The Template Designer allows you to do a multitude of things (see Blogger in Draft).

How do I get the new New Template ? 

Monday, 27 September 2010

Tina's Tutorials #6: Get LinkWithin below your posts


This tutorial will teach you how to get the widget LinkWithin below your blog posts.

Step 1:
Go to Link Within. Enter in your email address, blog link, platform (Blogger), and width (3 stories is recommended). If you have light text on a dark background, check the textbox.

Click on Get Widget:


Step 2:

Click on the Install Widget link, and a new tab will open up. Click on the blue button Add Widget.


Step 3:
Drag the LinkWithin gadget in the Edit Layout pages from the left toolbar to a space under your blog.


Step 4:
Click on SAVE and view your blog to see the changes you have made. Congratulations! You have now installed LinkWithin in your blog.


✂ - - - - - - - - - - - - - - - - - - - - - - - - - - - - - - - - - - - - - - - - - -

More Tips & Tricks from Tina:


 s

Tuesday, 7 September 2010

Tina's Tutorials #4: 2 column/3 column layouts

How to change your layout: a step by step guide

This tutorial will teach you how to change the layout of your blog to one with two, or three, columns.

Step 1:

Sign into your blog, and when you access it, click on the Design button on the top right corner of your blog.


Alternatively, go into your Dashboard, and click on Design under your blog.


Step 2:
It should lead you to this page:


Click on Template Design.


Step 3:

That will lead you to the Blogger Template Designer.

In the first column, click on Layout. Then select Body Layout.


In the picture above, you will notice that I have labelled four of the eight various layouts.

Layout 1: No columns - just the main body of your blog

Layout 2: Two column layout, with all your gadgets on the right.

Layout 3: Three column layout, with your gadgets on both the left and right.

Layout 4: Two column layout, with all your gadgets on the left.

The other layouts are variations that you are free to try out. I wouldn't advise using the two in the last column; they make the bady of your posts too narrow, and it is often difficult to place large graphics.

Click on each of them to see how they affect your blog. For the type of layout that I have here on Book Couture, use Layout 3.


Step 4:
 
Remember to save your progess by clicking on Apply to Blog. Then click on View Blog to view the changes made.


And that's it! I hope that helped you.

If you have any questions, feel free to leave a comment below.

For more blogger tips and tricks, check out:

Blogging Tips & Tricks 1: Links, Coding and Video Embedding 
  •  How to post links to your blog, email, and sites in general.
  •  How to add a video to your post 
Blogging Tips & Tricks 2:  Symbols and Ascii Art
  • How to access and add symbols and text art to spice up your posts
Blogging Tips & Tricks 3: How to make Pages
  • How to make pages on your blog
  • How to edit the header linking to pages
Visit this page to find more tips and tricks.

Sunday, 29 August 2010

Tina's Tutorials #3: How to make Pages


Pages are seperate posts on your blog that can be linked to via a header.
It is a common way on blogger to link to review policies, contact information, profiles, etc. The advantages of having pages is that links to important information is easily accessible to others visiting your blog.


How to make pages: a step by step guide


Step 1:
In your blogger dashboard, click on design.


Step 2:
You should now be in the "Design" tab.  Go to the "Page Elements" subtab.


Step 3:
Under your header, click on "Add a Gadget".


Step 4:
This box should pop up. Click on the + button next to pages.


 Pages should now be added to your blog design. Save your Page Elements.


Step 5:
To edit your page elements, go to the Posting tab, and click on the "Edit Pages" subtab that should now have appeared.


Step 6:
To make a new page, click on the blue rectangular button that says "New Page". Once it has been created, existing pages will appear below, and you may edit, delete or view them.


To edit the header:


Step 1:
Click on the Design tab.


Step 2:
It should bring you to this page:

Click on "Template Designer".


Step 3:
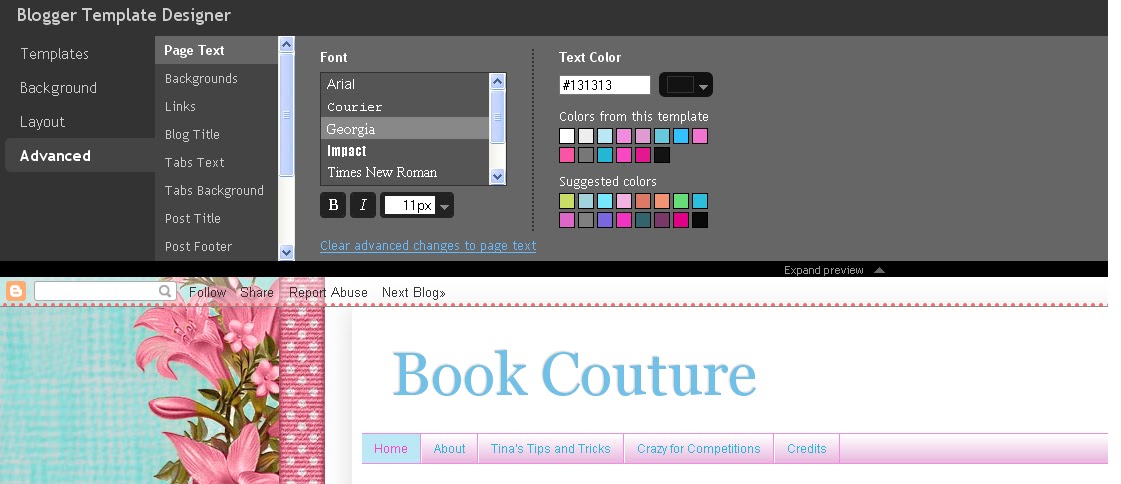
Once you are in the "Blogger Template Designer", click on the Advanced tab.


Step 4:
In the Advanced tab, click on "Tabs Text".

What you need to edit is the text color (how the text of the page will appear in your header when it is not selected), and the selected color (how the text will appear when the page is selected).

Experiment around until you get it right.


Step 5:
Remaining in the Advanced tab, click on "Tabs Background".
What you need to edit is the background color (how the color of your header will appear when the page is not selected), and the selected color (how the color of your header will appear when the page is selected).
Experiment around until you get it right.


Step 6:
Remember to Save your progess by clicking on "Apply to Blog". Then click on "View Blog" to view the changes you've made.


That's it! I hope you found this useful!

If you have any questions, feel free to leave a comment below. If there is anything blogger related that you would like to ask about or request a tutorial for, I would be happy to oblige and help.

For more tutorials, check out the page Tina's Tips and Tricks.

Happy blogging,
Tina

Thursday, 19 August 2010

Tina's Tutorials #2: Symbols

Blogging Tips and Tricks #2: Symbols and ascii art

If you need to beautify your posts or layouts, symbols are a great way of adding elegance and refinement without the need for complicated flashy graphics.

Note: If you DO use these symbols, please link to this page, so others will know where to get some too.


To put symbols onto your blog:

1. In Windows XP or lower, go to:
Start> All Programs> Accessories> System Tools> Character Map.

2. In the scroll down menu, select a font that you would like to use.  I would suggest Webdings or Wingdings for symbols.

3. Double-click on a character you would like to use, and click on "copy" in the bottom right-hand corner of the window. The symbol has now been copied to your clipboard.

4. Paste it anywhere you like.

For detailed instructions, go here.


Here's a compilation of useful symbols that I have found on the net:
(credits: compiled from this handy site)

♋ 웃 유 Σ ⊗ ♒ ☠ ☮ ☯ ♠ Ω ♤ ♣ ♧ ♥ ♡ ♦♢♔ ♕ ♚ ♛ ★ ☆ ✮ ✯ ☄ ☾ ☽ ☼ ☀ ☁ ☂ ☃ ☻ ☺ ۞ ۩ ♬ ✄ ✂ ✆ ✉ ✦ ✧ ∞ ♂ ♀ ☿ ❤ ❥ ❦ ❧ ™ ® © ✗ ✘ ⊗ ♒ ▢ ▲ △ ▼ ▽ ◆ ◇ ○ ◎ ● ◯ Δ◕ ◔ ʊ ϟ ღ 回 ₪ ✓ ✔ ✕ ✖ ☢ ☣ ☤ ☥ ☦ ☧ ☨ ☩ ☪ ☫ ☬ ☭✖✗✘♒♬✄ ✂✆✉✦✧♱ ❤ †♰♂♀☿❤❥ ❦❧ ♡♦ ♢♔♕♚♛★ ☆✮ ✯☄☾☽ ☼☀☁☂☃☻ ☺☹ ☮۞۩ ☎☏¢ ☚☛☜☝☞☟✍ ⌘

Currency:
¢€£¥

Circled numbers and alphabet:
➀➁➂ ➃➄➅ ➆➇➈ ➉
➊➋➌➍ ➎➏➐➑➒➓
ⒶⒷⒸⒹⒺⒻ ⒼⒽ ⒾⒿⓀ ⓁⓂⓃ ⓄⓅⓆ ⓇⓈⓉⓊⓋ ⓌⓍⓎⓏ
ⓐⓑⓒⓓⓔⓕⓖⓗ ⓘⓙⓚⓛⓜⓝ ⓞⓟⓠⓡⓢⓣ ⓤⓥⓦⓧⓨⓩ
e.g.  Ⓑⓞⓞⓚ Ⓒⓞⓤⓣⓤⓡⓔ

Chess
♚ ♛ ♜ ♝ ♞ ♟
♔ ♕ ♖ ♗ ♘ ♙

Hands
☚ ☛ ☜ ☝ ☞ ☟

Cross
☩ ☨ ☦ ✙ ✚ ✛ ✜ ✝ ✞ ✠

Snow/Star
✦ ★ ☆ ✰ ✮ ✯ ❇ ❈ ❅ ❄ ❆ ╰☆╮

Flowers
❃ ❀ ✿ ❁ ✾

Music
♪ ♫ ♩ ♬ ♭ ♮ ♯

Weather (sun, rain, snow)
☼ ☀ ☁ ☂ ☃ ☄ ☾ ☽ ❄

Religion
☯ ✡ ☨ ✞ ✝ ☮ ☥ ☦ ☧ ☩ ☪ ☫ ☬ ☭ ✌ 卐

Gender, love
♋ ♂ ♀ ☿ ❤ ❥ 웃 유 ♡

Messaging/Writing
✉ ✍ ✎ ✏ ✐✑✒ ⌨

Zodiac signs
♈ ♉ ♊ ♋ ♌ ♍ ♎ ♏ ♐ ♑ ♒ ♓

Blocks

▀ ▁ ▂ ▃ ▄ ▅ ▆ ▇ █ ▉ ▊ ▋ ▌ ▍ ▎ ▏ ▐ ░ ▒ ▓

Copyright: ™ © ®

Quotes: ❝❞


Text Boxes:
Feel free to experiment with the symbols above to create ascii art that is uniquely you.

▀▄▀▄▀▄▀▄▀▄▀▄▀▄▀▄▀▄▀▄▀▄▀▄
              Your text goes here                     

▀▄▀▄▀▄▀▄▀▄▀▄▀▄▀▄▀▄▀▄▀▄▀▄

●▬▬▬▬๑۩۩๑▬▬▬▬●
       Your text goes here
●▬▬▬▬๑۩۩๑▬▬▬▬●

╔════════════════╗
        Your text Goes here
╚════════════════╝

        *•.¸(*•.¸♥¸.•*)¸.•*´
♥«´¨`•°text goes here°•´¨`»♥
        ¸.•*(¸.•*´♥`*•.¸)`*•

*´¨)
¸.•´¸.•*´¨) ¸.•*¨)
(¸.•´ (¸.•` ♥ Text goes here

ஜ۩۞۩ஜ Your text goes here ஜ۩۞۩ஜ


Falling stars ascii art: (you could replace with symbols from above)

┊  ┊  ┊  ┊
┊  ┊  ┊  ★
┊  ┊  ☆
┊  ★
☆

Tuяn Up Tнe Vσℓυмe♪

: .♬ ♫ılı.——Volume——.ılı.♪ ♫ ♬
: ▄ █ ▄ █ ▄ ▄ █ ▄ █ ▄ █
: Min- – – – – – – – – – -●Max


Faces:
٩(●̮̮̃•̃)۶ ٩(-̮̮̃-̃)۶ ٩(͡๏̯͡๏)۶ ٩(-̮̮̃•̃)۶ ٩(×̯×)۶ ಠ_ಠ
☻♥☻
/█\/█\
⎝⏠⏝⏠⎠
Hope you enjoy these, and don't be afraid to experiment. Feel free to copy and use these symbols as you wish!


*´¨)
¸.•´¸.•*´¨) ¸.•*¨)
(¸.•´ (¸.•` ♥ xoxo Tina

Coming up next - Colour changing tools and text generators